Configure Azure Active Directory as a SAML Federated Identity Provider in WSO2
The following steps describe how to integrate Azure Active Directory with WSO2 as a SAML Federated Identity Provider, giving CMP![]() Converged Monetisation Platform. The MDS Global product that supports customer care and billing for digital service providers. 8 SAML SSO (Single Sign-On) capabilities via Azure Active Directory.
Converged Monetisation Platform. The MDS Global product that supports customer care and billing for digital service providers. 8 SAML SSO (Single Sign-On) capabilities via Azure Active Directory.
The first step is to configure an application in Azure to communicate with the WSO2 server during the SAML-based federation.
-
Log in to the Microsoft Azure management portal with your existing Office 365 admin credentials.
-
From the Microsoft Azure Dashboard, navigate to Enterprise Applications and select New Application.
- Select Create your own application.
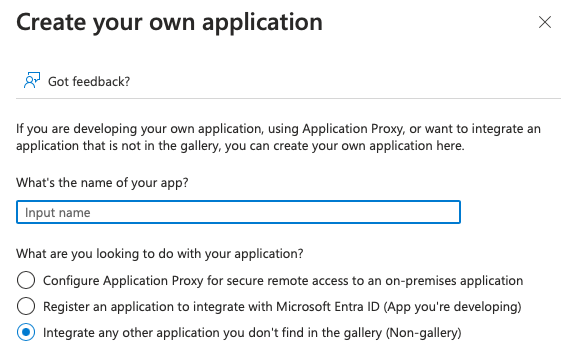
- Enter a name for your application, for example, CMP 8, select Integrate any other application you don't find in the gallery (Non-gallery), and then select Create.
-
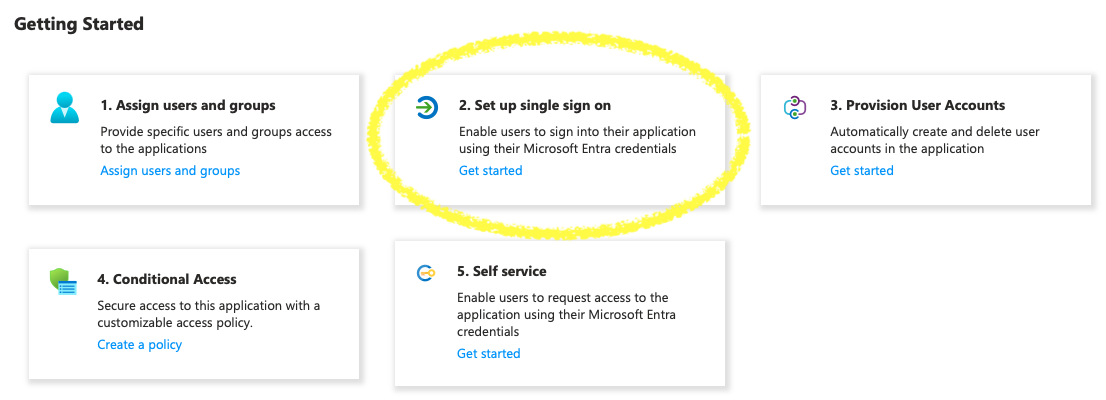
When the application has been created, select Get Started from the Set up single sign-on menu option.
-
Select SAML as the single sign-on method.
You are redirected to the SAML-based Sign-on page.
-
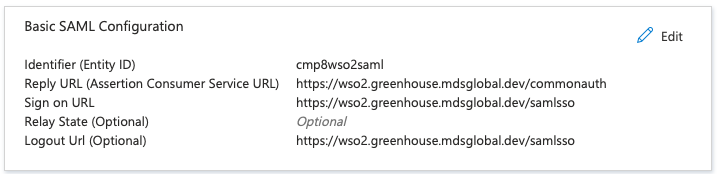
Add the following values in the Basic SAML Configuration section, then save and exit.
-
Identifier (Entity ID): Enter A Unique Entity Identifer (e.g. cmp8wso2saml)
-
Reply URL (Assertion Consumer Service URL):
https://<wso2_base_url>/commonauth -
Sign-on URL:
https://<wso2_base_url>/samlsso -
Logout Url:
https://<wso2_base_url>/samlsso
Your configuration for this application should look like the one below (you may need to refresh the page to view the new configurations).
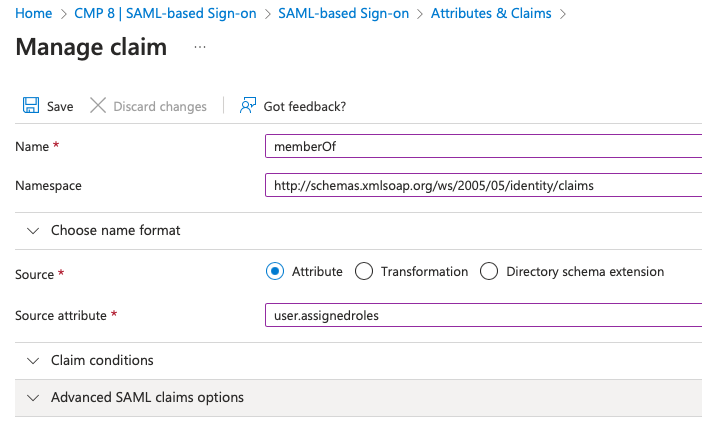
Next, configure the claims which will be passed in the SAML response to APIM Server during the federation. A new claim must be added to support application roles.
-
-
Select Edit in Attributes & Claims and select Add new claim.
-
Add the following values and then save your changes:
-
Name: memberOf
-
Namespace:
http://schemas.xmlsoap.org/ws/2005/05/identity/claims -
Value: user
 A person with the capability to log in to the CMP GUI software, such as a customer service advisor or agent..assignedroles
-
-
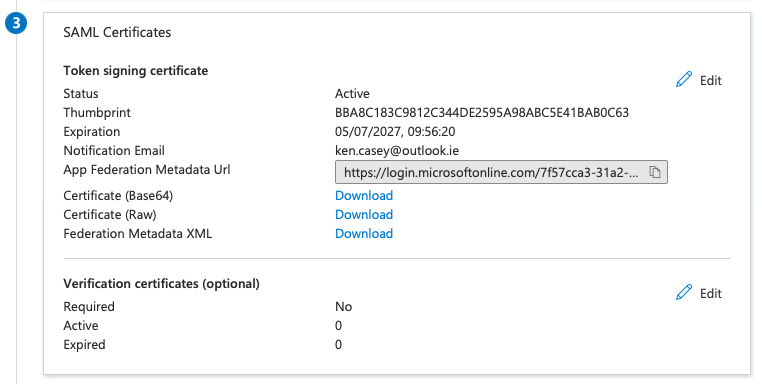
Download the raw certificate and save to a location for later use when setting up the Federated IDP in WSO2.
-
From the Azure dashboard, navigate to App Registrations > All applications, and select the app that was created in the above step.
In order to conform with the role based authorisation within CMP 8, application roles to be used must be configured in Azure for each of the CMP 8 security groups.
-
Select Manage > App Roles and create a new role for each of the security groups defined in the documentation here. Default app roles can be removed if desired, but this is not necessary.
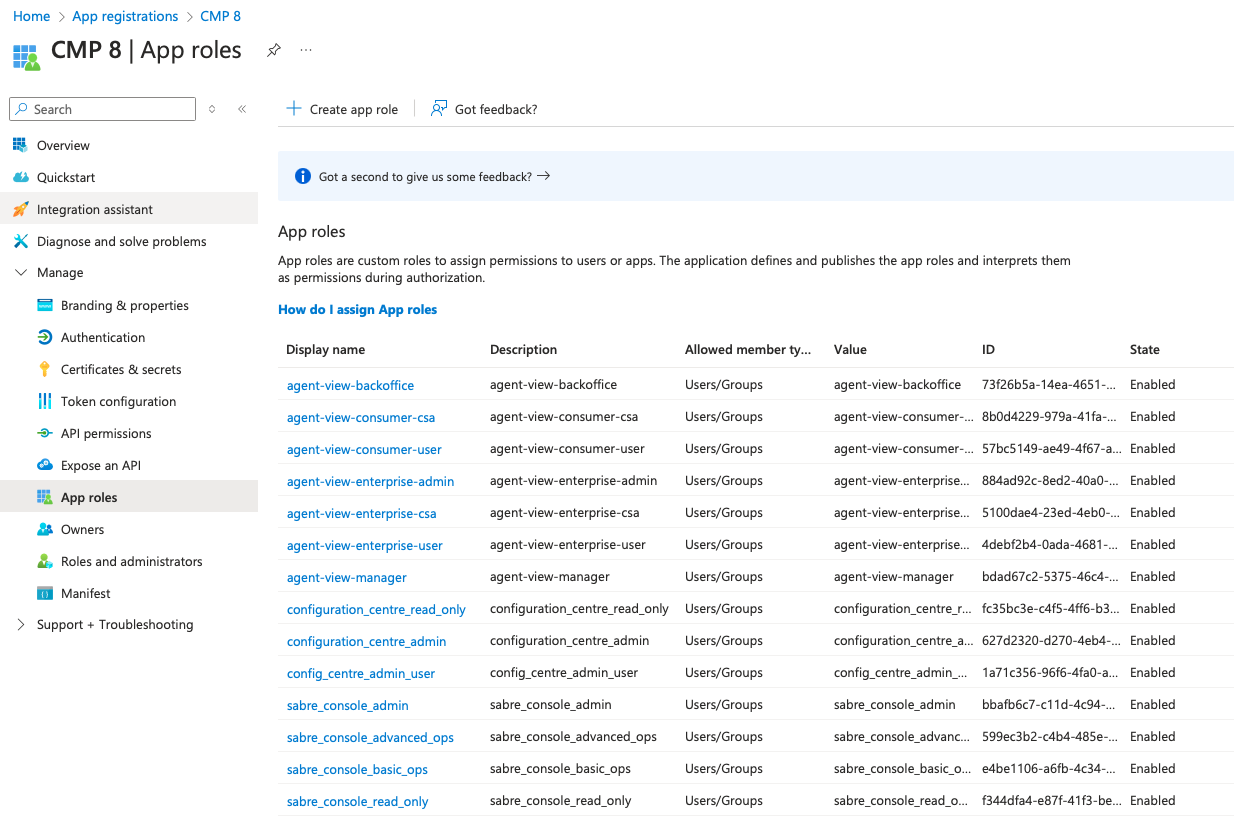
Azure AD integration can only be configured for UI modules of CMP 8 and is not compatible with Web Service based modules such as SOAP and REST
Representational State Transfer. An architectural style that specifies constraints, such as the uniform interface, that if applied to a web service results in performance, scalability, and modifiability, optimising services to work on the Internet.. Therefore, only Security Groups for AgentView The graphical user interface of the CMP that is typically used by Customer Service Agents to access CMP customer and billing data. In versions prior to CMP 8.0, this was called the CMP GUI., Business Configuration A module in the CMP Administation console that provides for viewing and modification of business and user applicable system configuration. and Batch need be configured in Azure. -
To add users and assign roles from the Azure dashboard, navigate back to Enterprise Applications and select the Application that was created earlier.
-
Navigate to Manage > Users and groups, and select Add user/group
In the Customer Manager Platform hierarchy, the highest level of the structure. The group level can be used to group corporates. Groups can hold financial information. to provide access to CMP 8 to specific users from Azure AD. To assign a user multiple roles, you will need to add multiple entries.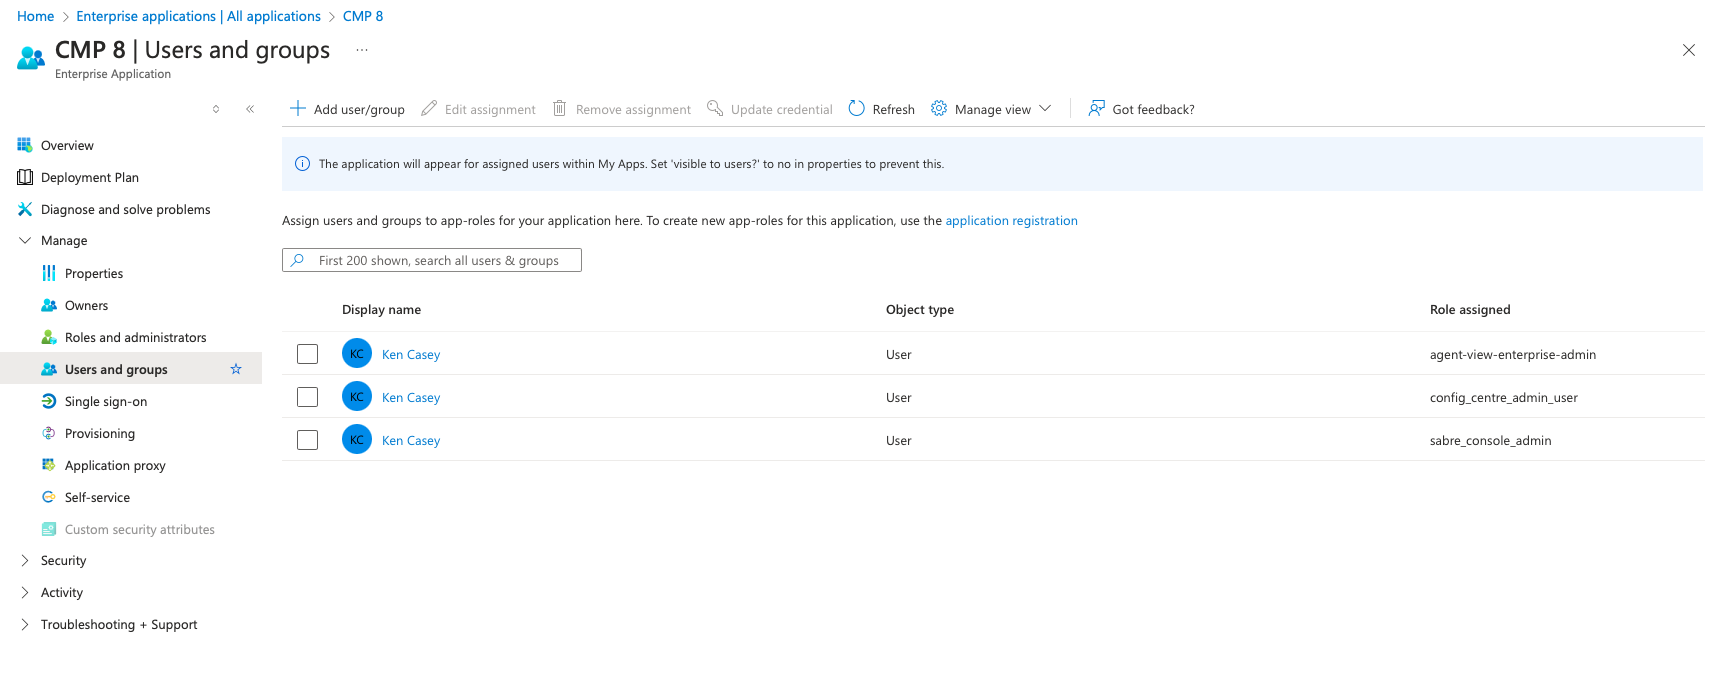
The configurations needed for the federation on Microsoft Azure are complete.
Navigate to Manage > Single sign-on to view all of the necessary details required to configure the Identity Provider in WSO2.
-
Log in to the WSO2 Management Console using the admin credentials.
-
Navigate to Identity Providers on the left-hand pane, and select Add.
-
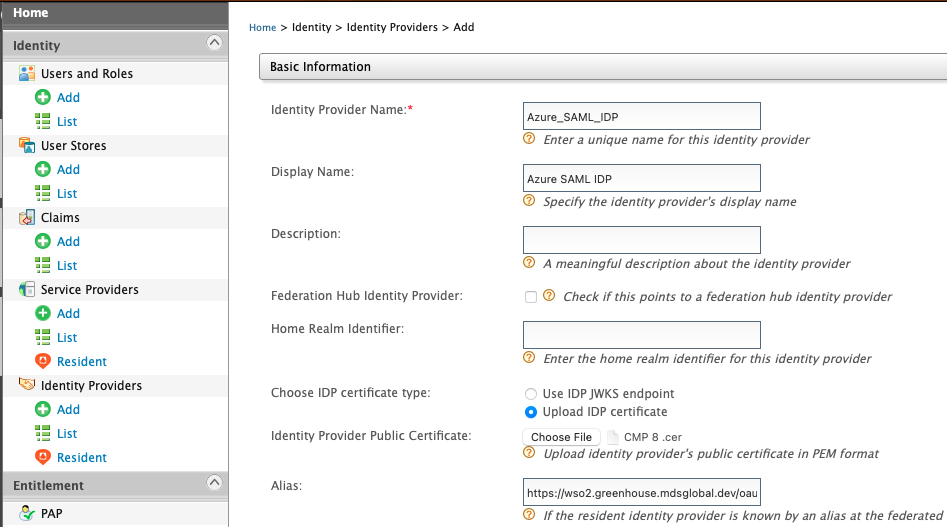
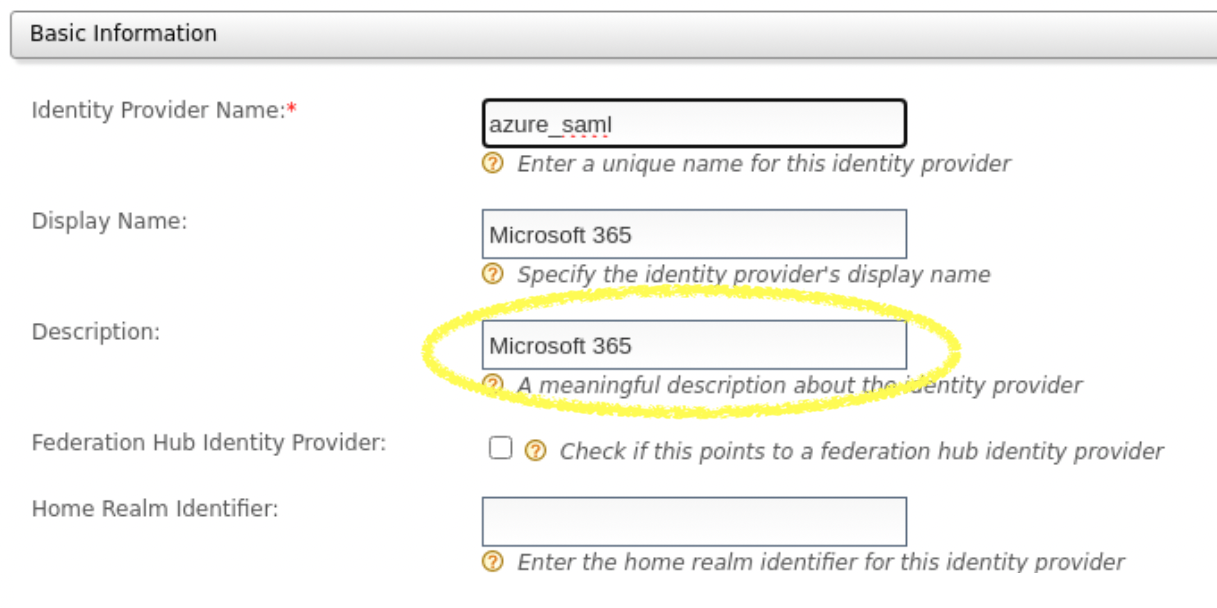
Enter the following details under Basic Information:
-
Identity Provider Name: (*Required) e.g. Azure_SAML_IDP
-
Display Name: e.g. Azure SAML IDP
-
Description: e.g. Microsoft 365 Login
-
Home Realm Identifier: e.g. Azure_SAML_IDP. Note: This must be the same as Identity Provider Name.
-
Alias:
https://<wso2_base_url>/oauth2/token -
Select Upload IDP certificate from Choose IDP certificate type, and upload the raw certificate that was downloaded earlier from Azure.
-
-
Expand the Claim Configuration accordion, and select Define Custom Claim Dialect to map and configure the Azure AD claims with WSO2.
-
Select Add Claim Mapping, and enter the following custom mappings:
SetIdentity Provider Claim URI Local Claim URI http://schemas.xmlsoap.org/ws/2005/05/identity/claims/givennamehttp://wso2.org/claims/givennamehttp://schemas.xmlsoap.org/ws/2005/05/identity/claims/namehttp://wso2.org/claims/useridhttp://schemas.xmlsoap.org/ws/2005/05/identity/claims/surnamehttp://wso2.org/claims/lastnamehttp://schemas.xmlsoap.org/ws/2005/05/identity/claims/emailaddresshttp://wso2.org/claims/emailaddresshttp://schemas.xmlsoap.org/ws/2005/05/identity/claims/memberOfhttp://wso2.org/claims/rolehttp://schemas.xmlsoap.org/ws/2005/05/identity/claims/nameas the User ID Claim URI andhttp://schemas.xmlsoap.org/ws/2005/05/identity/claims/memberOfas the Role Claim URI.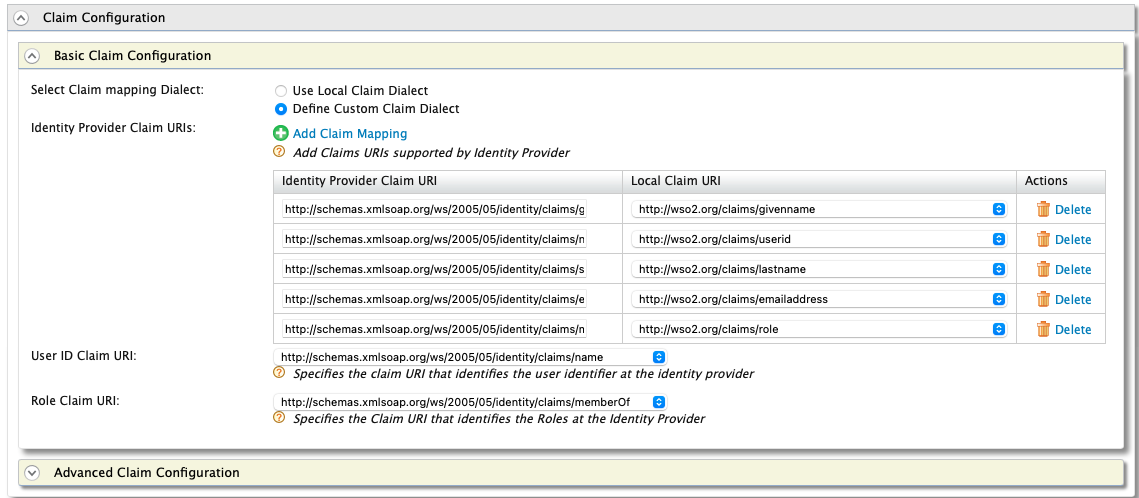
-
Expand the Role Configuration accordion to define the role mapping from Azure AD to WSO2. A mapping must be registered for each defined role.
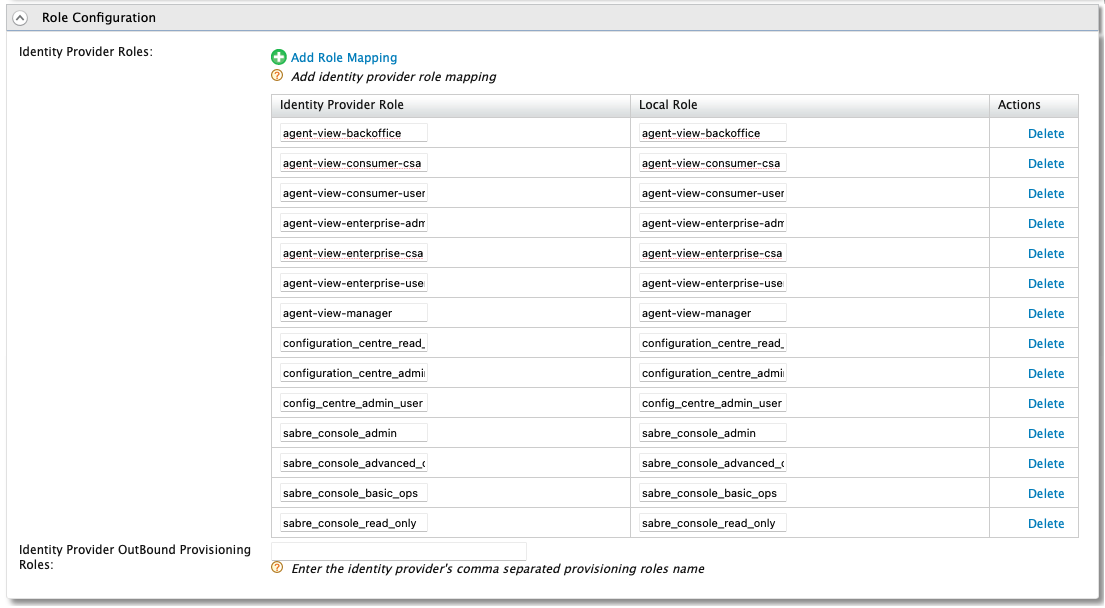
This is required regardless of whether the roles have been defined with the same value or not.
-
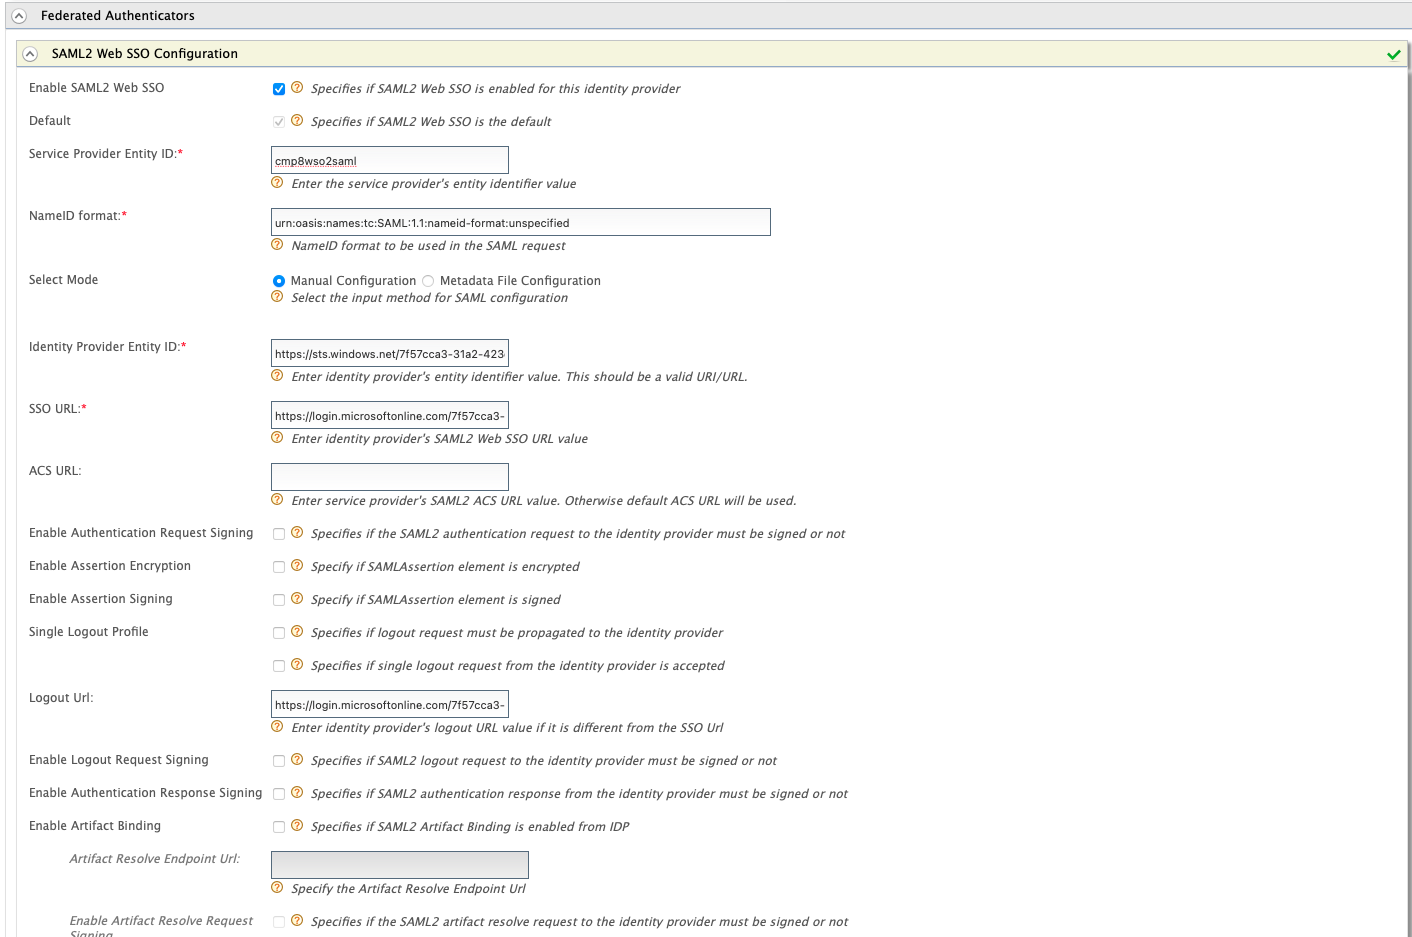
Expand Federated Authenticators, and then expand SAML2 Web SSO Configuration to configure the Federated SAML2 Authenticator. Input the following in the respective fields:
-
Enable SAML2 Web SSO: true
-
Service Provider
The owner of the infrastructure in which accounts will be created. The Service Provider can host and operate the instance of CMP, or CMP can be provided as a Managed Service. Entity ID: <"Identifier (Entity ID)" from Azure SAML Configuration (1)> -
Identity Provider Entity ID: <"Microsoft Entra Identifier" from Azure SAML Configuration (4)>
-
SSO URL: <"Login URL" from Azure SAML Configuration (4)>
-
Logout URL: <"Logout URL" from Azure SAML Configuration (4)>
-
Keep the remaining configurations as is.
-
-
Click Register to register the IDP.
-
Navigate to Service Providers > List to view the defined set of Service Providers for CMP 8 which are configured during the CMP 8 installation. These represent each module within the CMP 8 suite. The modules which can support Azure SSO Integration, and need to be modified, include:
-
sabre-console
-
bulk-action-console
-
configuration-centre
-
agent-view
-
-
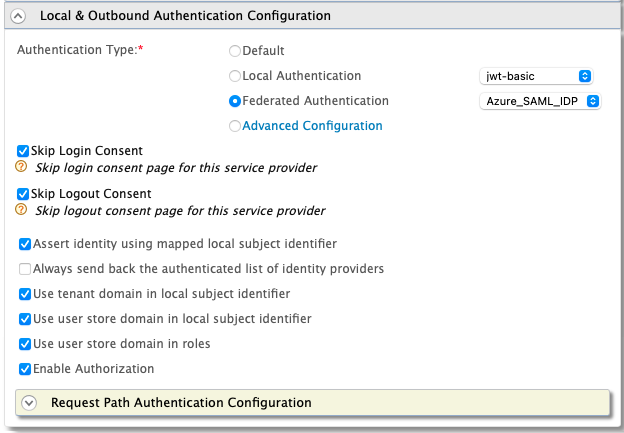
Select Edit on the agent-view service provider and expand the Local & Outbound Authentication Configuration accordion to configure the service provider for Federated Authentication.
-
Configure the service provider as displayed below, and then select Update to save.
-
Repeat the process for all other applicable Service Providers.
Now when navigating to any of the integrated modules, the user should be redirected to the Microsoft login page for authentication.
Update for 8.16
From 8.16 onwards the custom login page will allow for multiple authentication methods to be used for any given service provider. To configure this, you must select Advanced Configuration in the Local & Outbound Authentication Configuration accordion, and configure the steps as shown below:
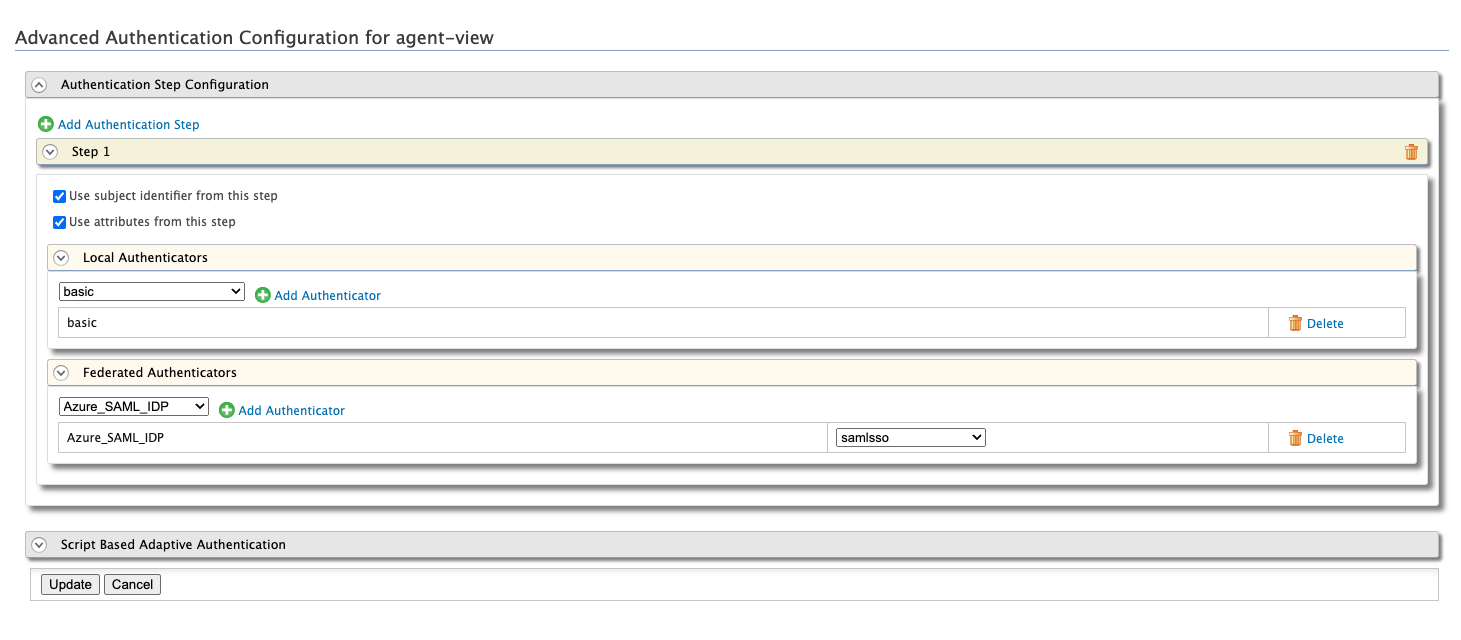
The button label will be retrieved from the Identity Provider's description as configured in WSO2 and must be configured.
This will result in the login page displaying multiple options for authentication.